• Skip to primary navigation
  • Skip to main content
  • Skip to primary sidebar
  • Home
  • Catagories
    • Books
    • Crafts
    • Dollhouse
    • Favorites
    • Food
    • Garden
    • Holidays
    • House
    • Musings
    • Organize
    • Places
    • Shopping
  • Contact
  • Nav Widget Area

    • Email
    • Instagram
    • Pinterest

Under a Blue Moon

Decor, cooking, organization, all the pretty things

Bottle Cap Pincushion

bottle cap pin cushion

Sorry for the radio silence on Friday.  We had our Granddaughter for the weekend and I neglected to plan ahead and schedule a favorites post.  I’m also a bit slow posting today.

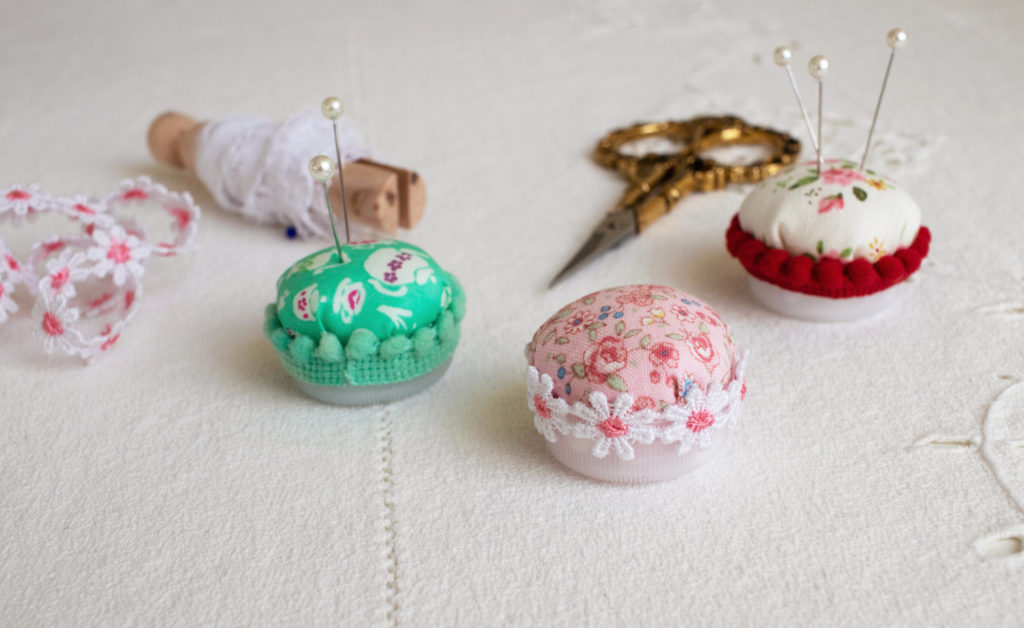
I wanted to share a cute, simple project with you.  I had an image of the most adorable bottle cap pincushions pop up on my Pinterest page and had to recreate them.  My inspiration came from Tea Rose Home (a lovely blog that I’m happy to discover).

bottle cap pincushion

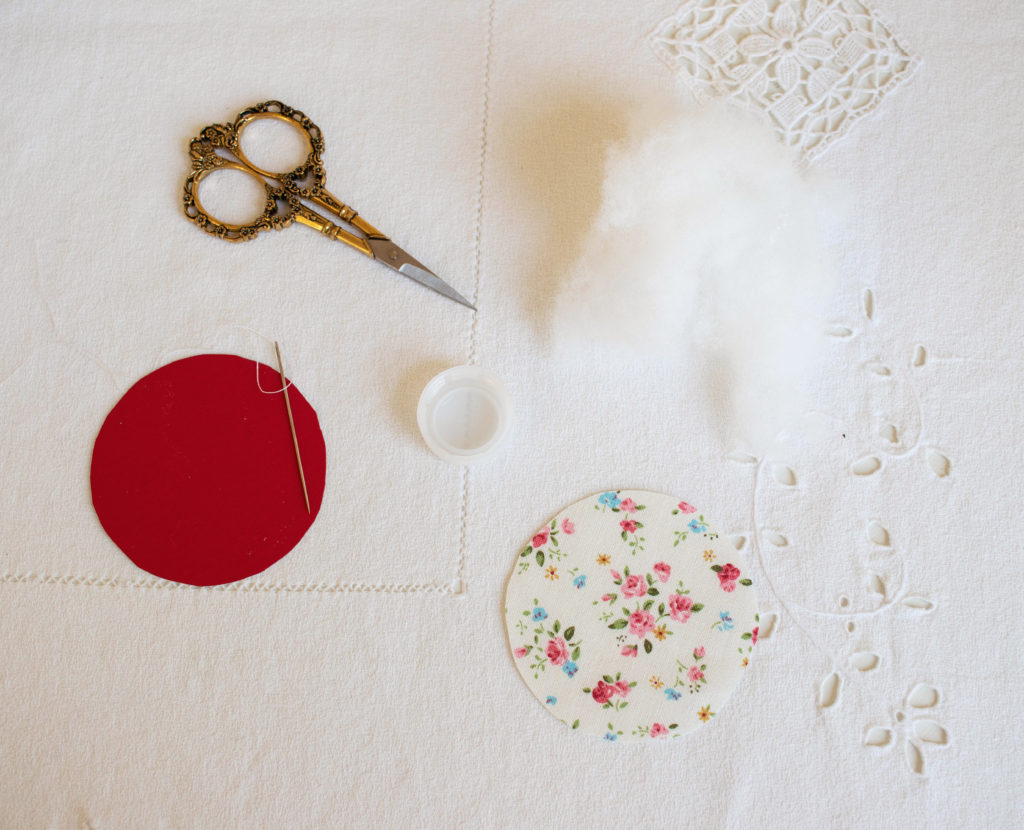
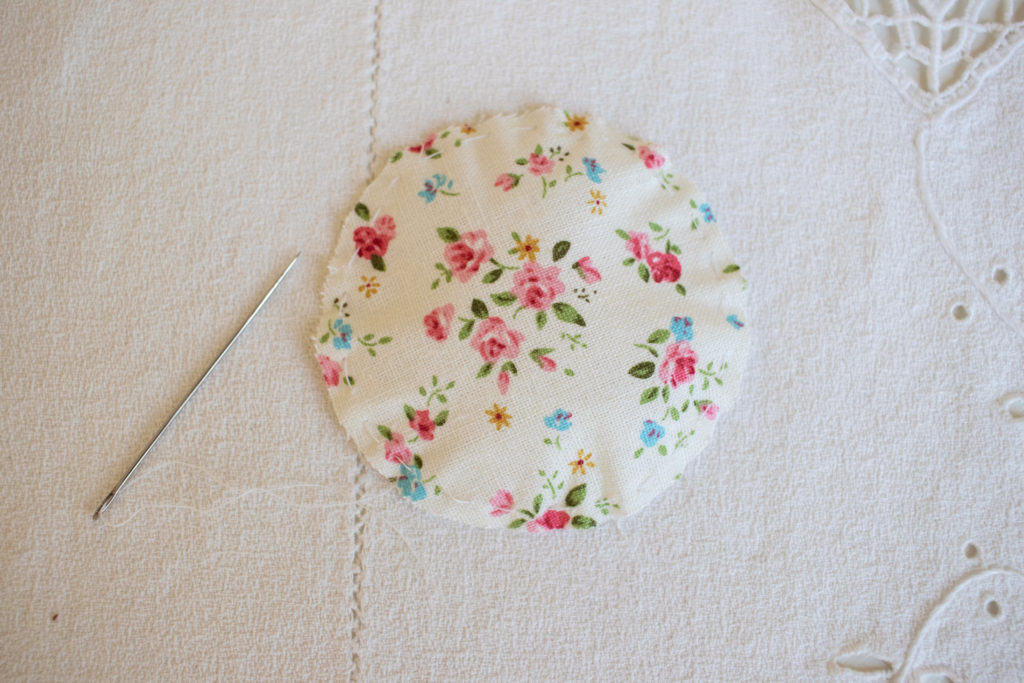
All you need is a bottle cap (like from a soda or water bottle), some fabric and some stuffing.  I created a 3″ circle template out of heavy cardstock which I traced on the back side of my fabric.

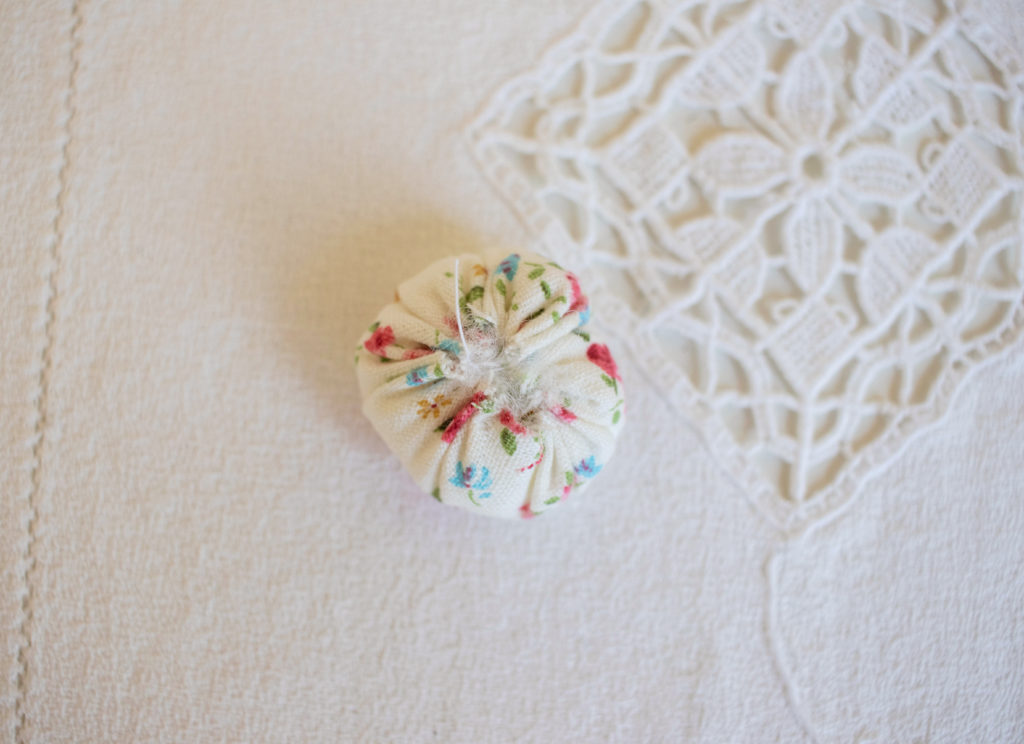
You sew a running stitch about 1/8″ from the edge of your cut out fabric, cinch it slightly, add some stuffing and then cinch it closed.

I added a few back and forth stitches before tying it off.  The trickiest bit was keeping the stuffing from coming out while trying to sew it closed.

Once it was stuffed and sewn shut I squirted some craft glue into the bottle cap and smooshed my little pincushion into it.  I added a little bit of decorative trim to finish it off.  Each one took about five minutes to make.

I think they would be so cute included in a little sewing related gift bag.

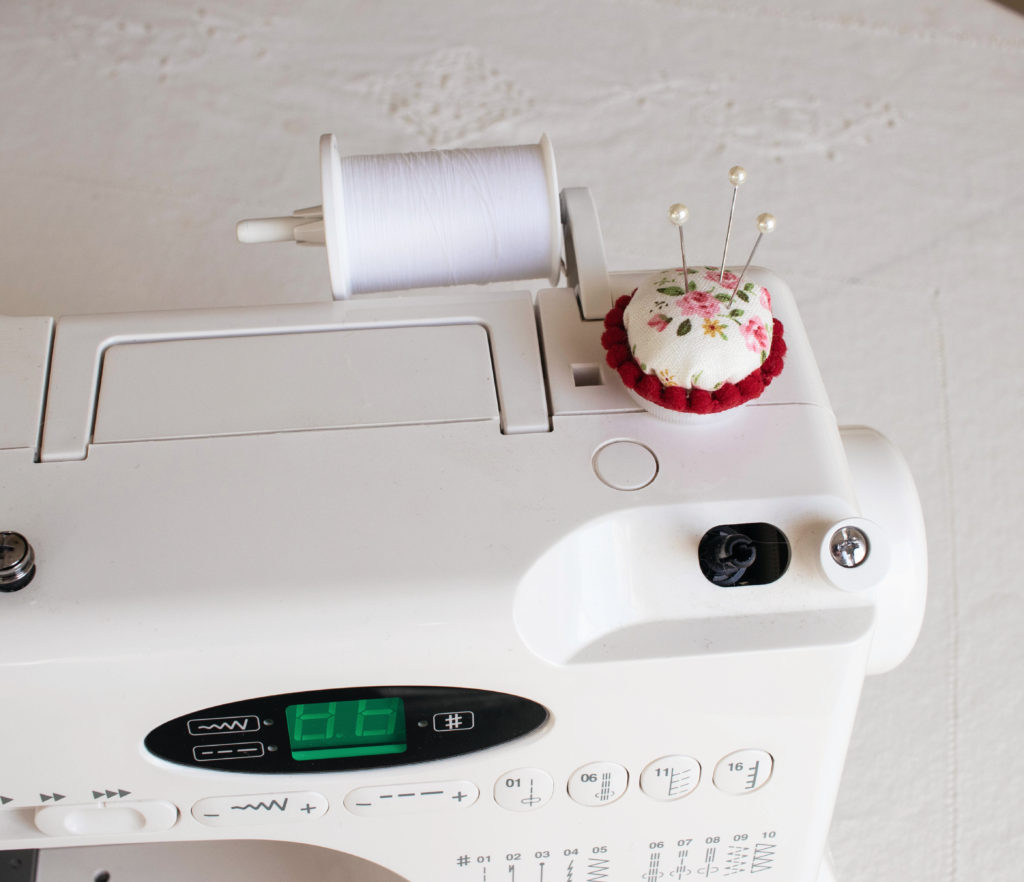
I made mine to be used on my sewing machine.  I added a small two sided adhesive square to the bottom and attached it to my sewing machine.  I have also seen versions where a loop of elastic was added to the bottom and worn like a ring.

Give it a try – I think you’ll find it as addictive as I did!

March 18, 2019 9:55 am Andrea Filed Under: Crafts

Creamy Zucchini Soup

zucchini soup

There is nothing more comforting than a nice creamy soup.  This soup was something my mother used to make and she had this ingenious way of semi prepping it and then freezing batches of it to have on hand.  The trick is to make it right up to the point you add the half and half and then portioning it and freezing it.  Then when you feel the need for cream of zucchini soup you just thaw the base, heat it up and add the half and half (or cream if you are feeling decadent) and serve with some nice crusty french bread.

It’s a very simple recipe and I think I’ve replicated it quite nicely.  I’ve added basil to my version which adds just the right touch of flavor to an otherwise bland vegetable.

zucchini soup ingredients

The beauty of this recipe is that the ingredient portions do not need to be precise.  A bunch of zucchini, some onion, chicken broth and half and half.

It calls for a small yellow onion but have you noticed how nearly impossible it is to find a *small* onion in the grocery store?  They are all huge!  Like softball size huge.  I did find a smaller one but if you can’t then just use half of a gargantuan one.

All you do is saute some onion and zucchini in a little bit of butter, add some chicken stock and simmer then just before you whir it all up add some fresh basil.  Add some half and half and dinner is served.   It is so delicious and so simple to prepare.

I do find that a dash of cayenne pepper does elevate the flavor of this soupd.

chopped zucchini and basil

Creamy Zucchini Soup with Basil

Creamy zucchini soup is elevated with a bit of fresh basil.
Print Recipe
Servings: 4
Course: Appetizer
Ingredients Method

Ingredients
  

  • 1 small yellow onion, chopped
  • 3-5 zucchinis Depending on size, use 3 to 5 zucchinis. Chop them into small pieces.
  • 2 tbsp butter
  • 4 cups chicken broth or stock
  • 12 oz. half and half
  • 1/3 cup chopped basil
  • 1 tsp salt
  • pepper to taste
  • dash cayenne pepper

Method
 

  1. Melt butter in stock pot.
  2. Add chopped onion and saute for five minutes until translucent
  3. Add chopped zucchini and salt and saute for an additional five minutes until softened
  4. Add chicken broth and peppers and bring to a boil. Turn down and let simmer for 20 minutes
  5. Remove from heat and add chopped basil. Purée with an immersion blender, or, if you don't have an immersion blender (which you need to make your life complete), then purée in batches in a blender.  At this point you can freeze the base and then reheat before adding in the half and half.
  6. Add half and half and bring back up to a simmer
  7. Taste for salt and pepper and adjust to taste. Serve hot

Since zucchini (at least in California) is available just about any time you want, this can be made any time of year.  If you have a particularly good crop of zucchini then you can freeze the base and pull it out during the winter when you are craving the taste of fresh vegetables.  Serve it with grilled cheese sandwiches or a nice crusty loaf of bread and you have the perfect, simple meal.

table setting


March 13, 2019 12:01 am Andrea Filed Under: Food

Back amongst the living…

Easter decor

Isn’t amongst a word?  Spell check is picking it up as suspect.  Well I’ve always used it and it’s too late to try to change me now.

I turned the corner this weekend.  By Saturday afternoon I was getting some energy back and not coughing nearly as much.  I think it helped that I finally got a good night’s sleep the night before.

On Sunday I pulled out my Easter decorations and started playing around with them.  I really don’t have much in the way of Easter related decor so it’s hard to come up with new and interesting ways to display them.  I had this very inexpensive cloche that I bought at Michaels around Halloween.   The base was originally black but I spray painted it a dull gold color.  I think my *Unibomber bunny looks great under glass with a little nest of moss and a fern frond.

*When my dad saw the bunny he asked “Is that a bomb on his back??”  So it’s the Unibomber bunny forevermore.

Do you decorate for all the holidays?  Some of the holidays?  None?  I only decorate for Easter, Halloween and Christmas.  Although occasionally I add some small american flags to the mix around the 4th of July.  I have one box for Easter decorations, three or four for Halloween and a bojillion for Christmas.

Maybe I’m giving the other holidays short shrift.

Although, in my defense, I did buy a shamrock plant on Saturday so I’m counting that as decorating for St. Patrick’s day.

cream roses

I have been loving these pale roses lately.  They are just the most delicate shade of blush.  I’ve been getting them at Trader Joe’s and they have had this same color for a few weeks now.  Here’s a tip for you when buying cut roses:  Pinch the buds.  They should be very firm, bordering on hard.  If they are at all squishy pass them by.  It means they aren’t all that fresh and will wilt quicker.

The weather promises to be good this week so maybe I’ll get out there and prune my rose bushes and do some weeding.  Happy Monday everyone!


March 11, 2019 11:51 am Andrea Filed Under: Holidays

Friday Favorites

Photo collage

Untitled  ◊  Let’s go find a rainbow  ◊  Untitled  ◊  disturbed

Oh goodness.  This flu/plague is hanging on for dear life.  I start to feel better during the day but then night time rolls around and I’m up half the night coughing.

This is day 11 by my calculations.   I have this theory that my body has been saving up for all the years I haven’t been sick and is walloping me with it now.

I hope to be back to a normal routine next week.  Sorry to be on here all complainy and snozzly.

I hope you have a lovely weekend.

March 8, 2019 10:43 am Andrea Filed Under: Favorites

From the Infirmary

Guest room

Current view.  I’ve got nothing today.  I started coming down with the flu last Tuesday and feel no better today than I did then.  If anything I might feel worse.

I’ve even taken to the guest room so Rick doesn’t have to hear me hack and cough all night.   I will say the guest room bed is really comfortable.  They say you should always spend the night in your own guest room so you can experience what your guests will.  I promise the bedding will be freshly laundered if you come stay with us.

I am one of those people that preaches how important it is to get a flu shot every year.  I pride myself on not having been sick in years (except for one, very unfortunate, food poisoning incident that happened about three years ago).  This flu season, however, I did not get a shot.  It was a combination of insurance changing, my doctor retiring and no longer working near the clinic with drop in flu shots.

But in the end I have no one to blame but myself.

Okay enough of that.

I’m hoping that I round some kind of corner in the next day or two so we can resume normal activities around here.  Until then, Happy Wednesday.  Get your flu shot.

March 6, 2019 12:01 am Andrea Filed Under: Musings

Doll House Chronicles – Part 1

Dollhouse furniture

I’m going to start a new series showing the progress on the doll house.  I’ve been procrastinating because I have a ton of work that needs to be done on the house and I don’t even know where to start.

This series will chronicle my progress, both with the house and with its furnishings.

I’ve actually  made the optimistic step of moving the doll house to my work table so it is easy to access and work on.

Edited to add:  I just realized I’ve never really shown a picture of the doll house on the blog.  It’s in a few background shots of the office but never a close up.  I’ll do that next week so you can see what I’m working with.   I think I have some pictures of when I first bought it off of Craigslist in all it’s Pepto pink and cobalt blue glory.

Doll house before

Last week I spent a couple of days working on fixing up some furniture that was given to me.  My friend gave me a couple of sets of furniture that her mother had in storage.  I have no idea how old they are but the sets were originally $5.99 each and between the two there are about 15 pieces.  Below are some of the wooden pieces.

Dollhouse furniture before

As you can see the quality is pretty poor but I think I can refurbish a few of them to work in the house.  What is weird is some are 1:12 in scale but there are a number of pieces that are smaller.  Like the vanity above.  It is just a tiny bit higher than the coffee table.

What I worked on was an armoire, a coffee table and a couch.  Let’s take a look at the couch first.

Red dollhouse couch

Yikes.  That is bright.  I do like the shape of it though.  I started by taking it completely apart.

Deconstructed dollhouse couch

I removed the red velvet from all the pieces except for the seat cushion and the backing on the couch.  Those I covered with a thin, light colored felt material to both block the red and add a little additional padding.

I then recovered everything in a flax colored linen material.

One thing I struggle with when it comes to upholstered doll house furniture is the thickness of the fabric can look odd to me.  There was a strange gap between the cushion and the bottom of the couch and the backing pieces.  To disguise it I took a thin scrap of the linen and glued a piece of string down the center of it.  I then folded it over and made sure the material was snug against the string.  I trimmed the excess and had a nice, to scale, length of welting.  I tucked the raw edge into the gap and I think it gives the piece a more finished look.

welting

Here is how it looks.  I also made a wee little throw pillow.

Doll house couch close up

The next thing I worked on was the armoire.

Dollhouse armoire before

It also has a nice shape but the finish is awful and it needed some smoothing of edges.  As you can see the hardware was already falling off (probably from spending decades in storage).  I removed the rest of the hardware and gave the piece a good sanding.  Then I put on the first coat of chalk paint.  Yikes again.  Look at that bleed through.  That is supposed to be white chalk paint.

Dollhouse armoire primered

I gave it a quick coat of shellac primer which helped on the outside but the inside was still bleeding through so I just went with it.  Let’s pretend I wanted the inside to be a rosy color.

It didn’t come with glass or plastic in the doors so I fashioned some screening (gutter guard actually) in its place.  I gave both the screening and the hardware a light coat of rose gold metallic paste.

Dollhouse armoire

I think this will store linens in the upstairs hallway.

The final piece is a coffee table.  I ran into the same problem with bleed through and I actually resorted to coating the piece with clear nail polish (it was late and I’m sick so it was the best I could come up with.  Patience isn’t my strong suit).

doll house coffee table

I used earring backs and gold beads for the knobs on the drawer.

I’m not sure what other pieces I’ll try to rehab.  Maybe the grandfather clock and the side table.  I can also see using the other cabinet piece in the kitchen.

Stay tuned.


March 4, 2019 12:01 am Andrea Filed Under: Dollhouse

« Previous Page
Next Page »

Primary Sidebar

How lovely to meet you!

Hi!  I am Andrea and I’m so glad you have stopped by.  click to read more

Subscribe to be notified of new posts!

Loading

Archive

Search

© Copyright 2016 · Pretty Lifestyle WordPress Theme by: PDCD